This week was a chill lesson 😎👯 as in there was no syllabus content taught but rather we used the time 🕑 to reflect 🧠💭on the idea that we've birthed 👶 thus far.
Dr Noel briefed us about a final presentation we had to prepare for on our chemical product in week 17 and that we had to make a prototype of our chemical product out of cardboard 📦📐🔨🔧using the skills learnt from Practicals 3 and 4 on joineries. But before we could get hands on 💪 and jumpy woo! 😜😸😆, we had to brainstorm and reflect on what were the operating principles of our product, the mechanism we would use to start off the operation and the mechanism we would use to enhance the operation.
As shown in our Week 13 blog, we have already roughly brainstormed our product's operating principles and done research 💻📝about it. However, just to tie everything together we will explain here again with some modifications made from the Week 13's blog. This blog will contain our most updated plan about the product in terms of operating principles and mechanism, the week 13 Blog's research is still applicable💥
💣Operating Principles:
📍Operating Principle 1: Heat transfer
Modes: conduction and convection
📍Operating Principle 2: Exothermic chemical reaction to produce heat via MRE and water.
The heat produced by the exothermic reaction is transferredvia conduction and convection to heat up the food in the portable food heater.
Elaboration: The heat generated by the exothermic reaction taking place below the detachable metal bowl with the food (refer to sketch 2 of revised product design) will be transferred by the rising hot gases via convection to the exterior of the metal bowl– stainless steel. The metal bowl will be tightly fitted inside the portable heater which means thatany harmful gases released as a result of the reaction will not be able to contact the food in the detachable metal container and acts as a solid medium which would in turn transfer heat to the food placed inside it via conduction hence heating up the food.
💣Original Design vs Revised Design:
Sketch 1: Original Design
Sketch: 2a
Sketch: 2b
Sketch: 2c
Sketches 2a-c : Revised Product Design
💥As we brainstormed, we realised that our original product design which had a metal plate as the solid medium to transfer heat from the hot rising vapours, products of the chemical reaction heated by the heat generated from the reaction to the plastic container sitting on the metal plate containing food was not an effective idea as the heat would travel through various surfaces to finally reach the food to heat it up meaning the resistance to heat transfer would be higher for the same surface area of the metal plate and plastic container which would mean the heat transfer coefficient would decrease and the overall heat transferred to the food would be low. This wouldnt be an effective prototype so we had to revise our design.
💣Revision made: Instead of a metal plate and a detachable plastic bowl, combine the two ideas to just having one detachable metal bowl, tightly fitted inside the heater. This means that before heating the food, the metal bowl in which the food would be stored would be cold so the user can touch it to remove (detachable) and add the MRE pack at the bottom of the heater as this is needed for the heater to function. Then the user can place back the bowl which would rest slightly above the base containing the MRE pack, fitted in the heater so it would not slide down. Then the user can place food in the bowl and water would be added to the MRE pack after which the reaction commences producing heat and will continously heat the food for 10 minutes producing about 50kJ of heat. This would make the heat transfer more effective since there is just one layer of solid resistance the heat flow would experience.
At this point we started questioning ourselves 😵💭👷 -> Since the metal bowl would be the direct medium of heat transfer via conduction to the food, how can we maximise the heat transfer? i.e. what material to choose for the metal bowl?? But as this product will involve food i.e. consumption for humans what is our priority exactly?
To sort these out, we decided a COWS diagram would be the best way to decide.
💣COWS MATRIX DIAGRAM
Reasoning: As Stainless Steel has the best chemical compatibility with the reagents and products in the reaction between the MRE heating pack and water thus in terms of the danger of toxicity it poses it is eliminated and it will not threaten the safety of the consumption of food. In terms of the thermal properties, for the metal plate in our food heater, we want it to be able to transfer as much heat as possible since Copper has the highest thermal conductivity, the second lowest specific heat capacity and a high melting point, would be the best option for the metal bowl. This is because it can transfer the highest amount of heat in a short period of time since it requires a low amount of heat in comparison to the other metals to increase its temperature by 1 unit of temperature. Thus, the heating efficiency of the heater with copper as the metal bowl material to in turn transfer heat to the food will be high since a high amount of heat from the source (MRE pack reaction) will be transferred to the food and it will get heated up in a short amount of time and the user will not have to wait long for the food to get heated. In terms of the chemical compatibility, copper has a good chemical compatibility with the product gases of the reaction which will be in direct contact with the metal bowlbut it has a poor chemical compatibility with water. This means the metal bowl made out of copper wouldn’t be food grade this is dangerous as the food placed in the metal bowl could have water content.Thus, our priority is the consumer’s safety and since stainless steel is the only metal that is food grade we will choose it for the metal bowl’s material.
References:
Emporium, S., 2021. carbon steel material supplier, carbon steel price in india, low carbon steel price in india. [online] Steelemporium.co.in. Available at: <https://www.steelemporium.co.in/carbon_steel.html> [Accessed 18 July 2021].
iscrapapp.com. 2021. [online] Available at: <https://iscrapapp.com/prices/> [Accessed 18 July 2021].
Calpaclab.com. 2021. Carbon Steel Chemical Compatibility Chart. [online] Available at: <https://www.calpaclab.com/carbon-steel-chemical-compatibility-chart/> [Accessed 18 July 2021].
Calpaclab.com. 2021. Stainless Steel Chemical Compatibility Chart. [online] Available at: <https://www.calpaclab.com/stainless-steel-chemical-compatibility-chart/> [Accessed 18 July 2021].
Matweb.com. 2021. Online Materials Information Resource - MatWeb. [online] Available at: <http://www.matweb.com/index.aspx> [Accessed 18 July 2021].
Next -> 💣MECHANISMS
Dr Noel told us that our product needs to have a mechanism that will enable the operation of the device i.e. what mechanism must we incorporate such that the chemical reaction can start off?
Based on research in week 13 blog, we found out that upon adding 30 ml of water to 1 MRE pack, the heating will take place for 10 minutes, providing around 50 kJ of heat to approximately 300 grams of food.
💣Mechanism of Chemical Device (Refer to Sketch 2 above for a better understanding)
Lever mechanism. The pullable compartment that holds the water has a slight glass level indicator. There is a level blocking the flow of the water out of the compartment, when the level is pulled, the water is released and comes into contact with the MRE pack which then begins the reaction to produce heat.
This lever mechanism provides two functions. Firstly, to heat up the food at one go, the user can just pull the lever to release all the water. Secondly, to keep the food warm for a long period of time, the user can use the level indicator to release the water at intervals to have a continuous reaction for a prolonged heating.
Then to wrap up the lesson, Dr Noel showed us a video about prototyping below:
- Prototyping rule 1: Find the quickest path to experience (the google glass team took one day to prototype the first working version of the headset display).
- Prototyping rule 2: DOING IS THE BEST TYPE OF THINKING = you never know if you never try
- Prototyping rule 3: Use materials that move at the speed of thought to maximise our rate of learning.
- Book Learning -> Sphere of human knowledge vsExpansive Learning -> infinite Realm of possibilities (i.e. how children can be more creative than adults because we think too much)
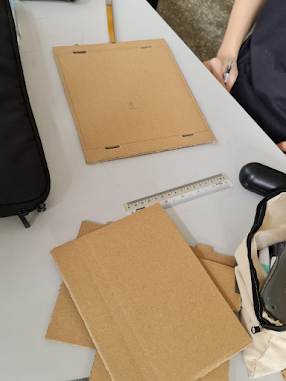
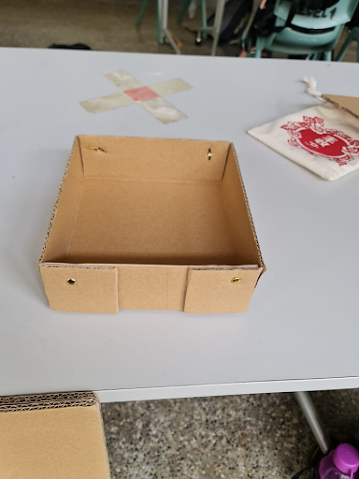
👷Some steps/instances of us prototyping our product👷: (pics taken by Serena)
Creating Slots and tabs joinery for our base
Creating our "metal bowl" in which food will lie -> Using holes and brass fasteners joinery
The final prototype will be revealed during week 17's presentation!


Comments
Post a Comment